How to Troubleshoot Garage Door Repair Issues
Dad And Daughter Garage Door Service

Identify garage door repair — most common problems and causes and learn safe DIY troubleshooting steps before calling a pro.
How to Troubleshoot Garage Door Repair Issues
Why Understanding Garage Door Repair Problems Can Save You Time, Money, and Stress
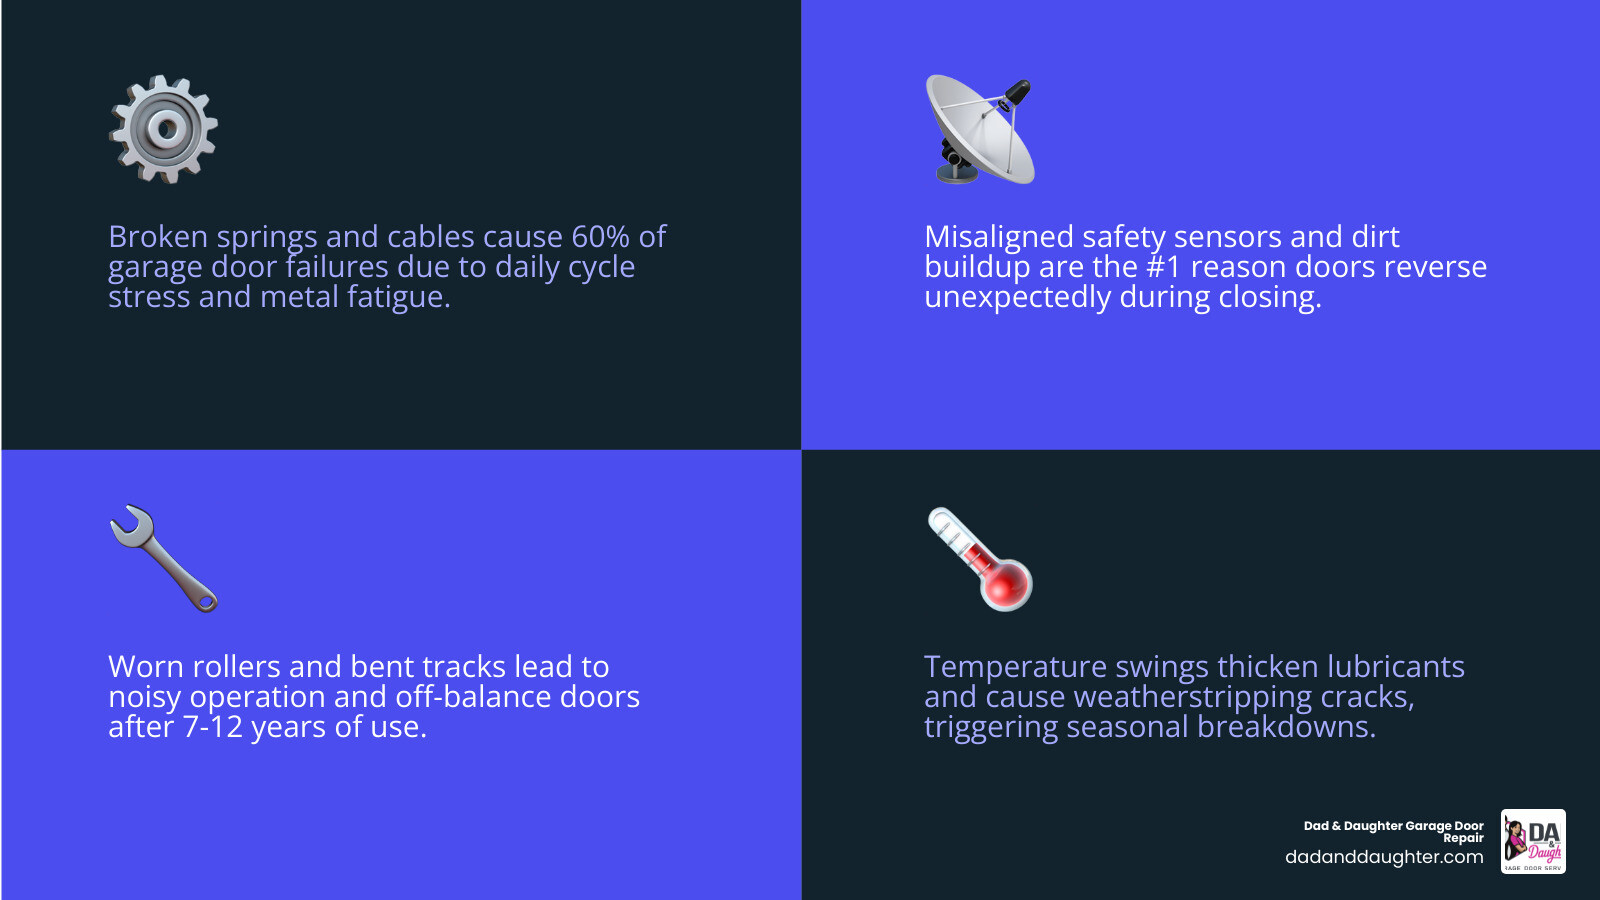
When it comes to garage door repair — most common problems and causes, most homeowners are dealing with one of a handful of familiar issues: broken springs, sensor problems, a malfunctioning opener, worn rollers, or a door that won’t open or close all the way. Catching these problems early — and knowing what’s behind them — can mean the difference between a quick fix and a costly emergency call.
Here are the most common garage door problems and what causes them:
- Broken or worn springs — Normal wear from daily use and temperature changes; springs typically last 7–10 years or about 10,000 cycles
- Frayed or snapped cables — Often fails alongside spring issues; caused by tension stress and age
- Malfunctioning opener or remote — Dead batteries, signal interference, logic board failure, or accidentally engaged lock mode
- Safety sensor issues — Misalignment, dirt buildup, or sunlight interference blocking the infrared beam
- Off-track or misaligned door — Bent tracks, popped rollers, or impact damage
- Worn rollers — Cracking, flat spots, or seized bearings after 7–12 years of use
- Noisy operation — Loose hardware, lack of lubrication, or failing components
- Weather-related problems — Temperature swings causing metal contraction, thickened lubricant, or cracked weatherstripping
Your garage door is one of the most used moving parts in your home. For many homeowners, it’s the primary way in and out of the house every single day. That kind of constant use puts real stress on springs, cables, rollers, tracks, and the opener system — and most problems don’t show up out of nowhere. They build gradually, starting with small signs like a new noise, a slight hesitation, or a door that feels heavier than it used to.
This guide walks you through the most common garage door problems, what causes them, how to safely diagnose what’s going on, and when it’s time to stop troubleshooting and call a professional.
Garage Door Repair — Most Common Problems and Causes
A residential garage door is a complex system of counterbalances, tracks, and electrical components. When one piece of this system fails, it places additional mechanical stress on the remaining parts, triggering a chain reaction of wear and tear. Understanding the root causes of these failures is the first step toward getting your door back in smooth working order.
Identifying Garage Door Repair — Most Common Problems and Causes for Springs and Cables
The springs and cables do the heavy lifting of your garage door. While many assume the garage door opener is what lifts the door, the opener simply guides and initiates the movement. The heavy lifting is actually performed by the tension stored within the springs.
Residential garage doors typically use either torsion springs (mounted on a metal shaft above the door opening) or extension springs (mounted along the sides of the horizontal tracks). Because they absorb and release extreme tension with every single cycle, they are subject to severe metal fatigue. A standard torsion spring is rated for roughly 10,000 cycles—which equates to about 7 to 10 years of normal daily use.
When a spring reaches its cycle limit, it will snap. This failure is usually accompanied by a loud bang that can sound like a gunshot or a firework exploding inside your garage. Once a spring breaks, the door will feel incredibly heavy, and you should never attempt to lift it manually or use the electric opener, as this can destroy the opener’s gears.
Cables work in tandem with the springs. They run from the bottom brackets of the door up to the drums on the torsion shaft (or through pulleys on an extension spring system). Over time, these steel cables can fray, rust, or slip off their drums. Operating a door with frayed cables is incredibly dangerous, as a snapped cable can cause the door to crash down unevenly, damaging the tracks, rollers, and panels. If you suspect your spring system is failing, you can read more on How to Diagnose Garage Door Spring Issues to spot the early warning signs before a catastrophic snap occurs.
Malfunctioning Openers, Remotes, and Wall Buttons
When your garage door refuses to respond to a command, the issue often lies within the electrical brain of the system: the opener, remote controls, or the wall button.
Common causes of opener failure include:
- Dead Remote Batteries: The simplest and most common culprit. If the wall button works but the hand-held remote does not, start by replacing the remote batteries.
- Vacation Lock Mode: Many wall consoles feature a “lock” button designed to prevent the door from opening via remote control while you are away. If the light on your wall button is blinking rapidly and the remotes won’t work, hold down the lock button for three to five seconds to disable this feature.
- Signal Interference: Some LED light bulbs installed inside the garage door opener unit emit radio frequency interference that blocks the signal from your remote control. If your remote only works when you are standing right next to the door, try replacing your garage light bulbs with specialized, shielded LED bulbs designed specifically for garage door openers.
- Stripped Drive Gears: If you hear the opener motor humming or running but the door itself isn’t moving, the plastic drive gears inside the motor unit may be stripped. This is common in openers that are more than 10 years old or have been operating with an unbalanced door.
For step-by-step guidance on handling these issues, you can check out our articles on How to Diagnose Intermittent Garage Door Opener Problems and How to Troubleshoot Garage Door Wall Button Failure. In rare cases, a malfunctioning logic board or external signal interference can even cause your door to open on its own, creating a security hazard. Learn how to address this specific issue in our guide on How to Fix Garage Door That Opens on Its Own.
Bent Tracks, Failing Rollers, and Sagging Panels
The tracks guide your garage door sections smoothly up and down, while the rollers act as the wheels that glide within those tracks. If either of these components becomes compromised, the door will struggle to move.
Track misalignment can happen gradually due to the vibrations of daily use loosening the mounting brackets, or suddenly due to an accidental bump from a vehicle. If the tracks are bent or out of alignment, the rollers can bind, causing the door to move jerkily, stop halfway, or pop completely out of the track.
Rollers themselves have a limited lifespan. Standard steel rollers with unsealed bearings typically last 5 to 7 years and are highly susceptible to rust and dirt buildup. High-quality nylon rollers with sealed ball bearings can last 10 to 15 years, operating much more quietly and smoothly. When rollers wear out, their bearings seize, causing the roller to slide rather than roll. This creates immense friction and can wear grooves into your metal tracks. For tips on identifying worn-out rollers, see our article on How to Diagnose Failing Garage Door Rollers.
Panel sagging and structural wear are also common in older doors or those made of heavy wood. Over time, repeated flexing can cause individual door sections to bow or crack. While a single damaged panel on a sectional door can often be replaced without replacing the entire door, ignoring a sagging panel can put extra strain on your rollers and hinges, speeding up the wear on the rest of your system.
How to Safely Troubleshoot and Diagnose System Failures
Before you begin inspecting your garage door, safety must be your absolute priority. A standard residential garage door can weigh anywhere from 100 to over 300 pounds, and the springs that balance this weight are under extreme tension. Always disconnect the power to your garage door opener before touching any mechanical parts, and never stand directly under a moving or malfunctioning door.
Testing the Safety Sensors and Photo-Eyes
Since 1993, federal UL 325 standards have required all residential garage door openers to be equipped with photo-eye safety sensors. These sensors are located on both sides of the door frame, no higher than six inches off the garage floor. They project an invisible infrared beam across the opening; if this beam is broken while the door is closing, the door will immediately stop and reverse to prevent injury or property damage.
If your garage door opens fine but refuses to close unless you continuously hold down the wall button, your safety sensors are almost certainly the issue.
To troubleshoot your photo-eyes:
- Check the Indicator Lights: One sensor (the sender) will have a solid green light, and the other (the receiver) will have a solid amber or red light. If one light is blinking or completely out, the sensors are out of alignment.
- Clean the Lenses: Wipe the lenses gently with a soft, dry microfiber cloth to remove dirt, dust, or spiderwebs.
- Align the Sensors: Loosen the bracket wing nut slightly and adjust the sensor until both indicator lights glow steadily without blinking. Tighten the bracket back down.
- Inspect the Wiring: Look for frayed, broken, or rodent-chewed wires running from the sensors up to the opener motor.
Performing a Manual Balance Test
A properly balanced garage door should be easy to lift manually and should stay in place when opened halfway. If the door is unbalanced, your opener has to work twice as hard, which will rapidly wear out the motor and strip the internal gears.
You should perform a manual balance test twice a year (in the spring and fall):
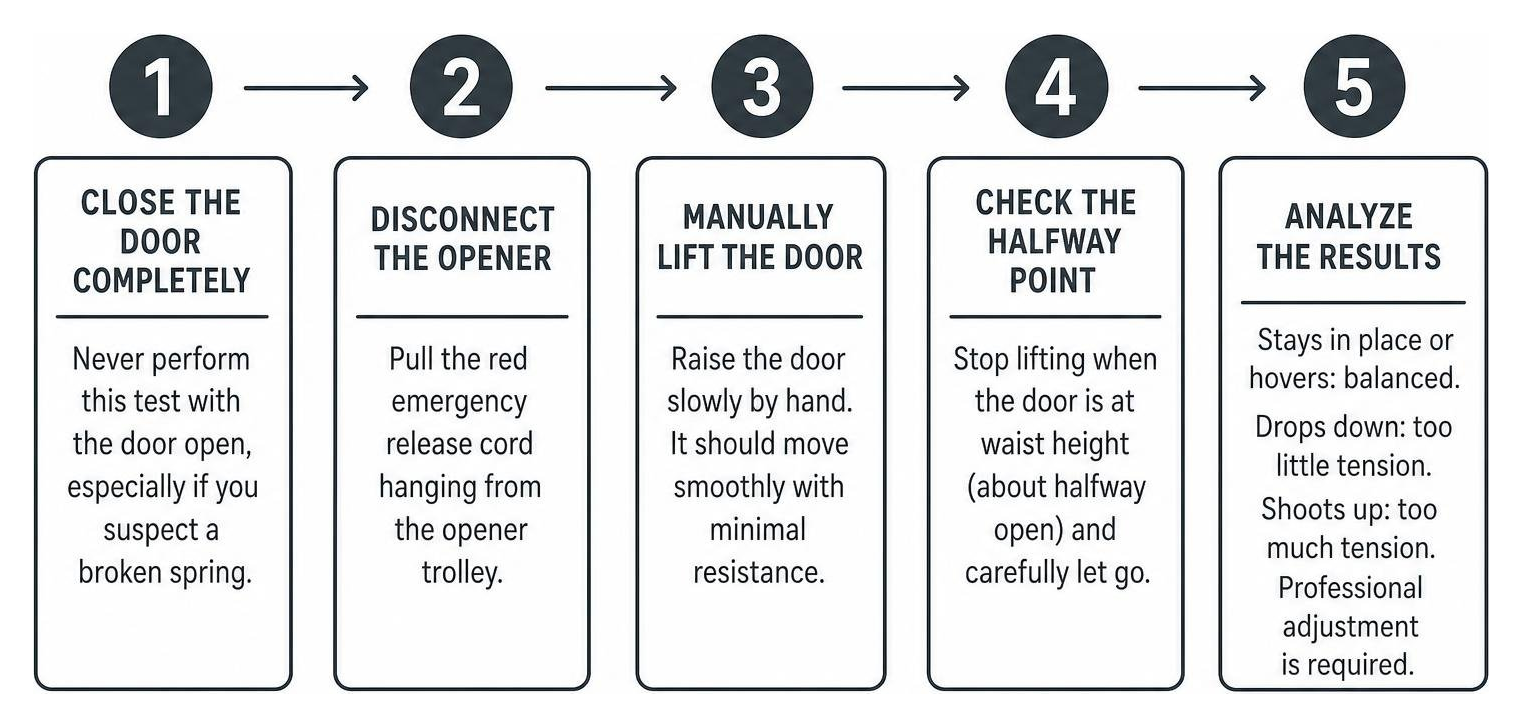
- Close the Door Completely: Never perform this test with the door open, especially if you suspect a broken spring.
- Disconnect the Opener: Pull the red emergency release cord hanging from the opener trolley. This disconnects the door from the automated drive system.
- Manually Lift the Door: Raise the door slowly by hand. It should move smoothly with minimal resistance.
- Check the Halfway Point: Stop lifting when the door is at waist height (about halfway open) and carefully let go.
- Analyze the Results: If the door stays in place or hovers slightly, your springs are properly balanced. If the door crashes down immediately, your springs have lost their tension. If the door shoots upward, the springs are wound too tightly. In either case, professional adjustment is required.
Identifying the Source of Loud or Unusual Noises
A noisy garage door is more than just an annoyance; it is often a cry for help from overworked metal components. By listening closely to the type of sound your door makes, you can narrow down the source of the trouble:
- Squeaking or Squealing: Usually points to dry rollers, hinges, or pulleys that desperately need lubrication.
- Grinding: A harsh grinding noise often indicates that the metal rollers are sliding rather than rolling, or that the internal gears inside your opener motor are failing. For a deeper look at this specific sound, read our Garage Door Grinding Noise Guide 2026.
- Rattling: Often caused by loose hardware. Over time, the vibrations of the door opening and closing can loosen the nuts, bolts, and screws holding your tracks and hinges together.
- Popping or Banging: A loud popping sound during operation usually suggests a binding spring or a cable that is catching on its drum.
When to Call a Professional vs. Attempting DIY Fixes
While there are several simple maintenance tasks you can handle yourself, knowing where to draw the line is critical for your safety and the longevity of your door.
| Task | Safe for DIY? | Requires a Professional? | Why? |
|---|---|---|---|
| Replacing Remote Batteries | Yes | No | Simple electrical swap; no safety risk. |
| Cleaning & Aligning Sensors | Yes | No | Basic adjustment; low voltage wiring. |
| Lubricating Moving Parts | Yes | No | Keeps the door running smoothly; easy maintenance. |
| Tightening Loose Hinges | Yes | No | Safe as long as you do not touch bottom brackets. |
| Replacing Springs | No | Yes | Extreme high-tension hazard; can cause severe injury. |
| Replacing Cables | No | Yes | Connected to high-tension springs; high risk of door collapse. |
| Realigning Off-Track Doors | No | Yes | Heavy lifting; risk of door falling out of tracks entirely. |
| Replacing Damaged Panels | No | Yes | Requires complete door disassembly and spring detensioning. |
High-Tension Hazards: Springs and Cables
We cannot emphasize this enough: never attempt to adjust, wind, or replace garage door torsion springs or cables yourself.
A standard residential torsion spring stores a massive amount of energy—often over 200 foot-pounds—when fully wound. If a DIYer uses the wrong tools (like screwdrivers instead of proper steel winding bars) or loosens the wrong set screw, that stored energy can release instantly and violently. This can spin winding bars with enough force to break bones, sever fingers, or cause life-threatening head trauma.
Additionally, the bottom brackets on your garage door are permanently connected to the lift cables, which are under the same extreme tension. Loosening a bottom bracket while the door is under tension can cause the bracket to fly off, snapping the cable and causing the door to fall instantly. Always leave spring and cable repairs to trained technicians who have the specialized winding bars, clamps, and safety gear to do the job safely.
Structural Damage and Off-Track Doors
If your garage door tracks are severely bent, or if the door has jumped completely off its tracks, do not attempt to force it closed or open.
Operating an off-track door can bend the tracks beyond repair, destroy the rollers, and burn out your opener motor. Worse, an off-track door is structurally unstable and can fall completely out of the ceiling brackets, crashing down onto your car or anyone standing nearby.
If your door is off-track, immediately disconnect the power to the opener and call a professional. A technician will secure the weight of the door, safely realign the tracks, reset the rollers, and inspect the cables to ensure the door operates safely.
Preventive Maintenance and Seasonal Care
Taking a proactive approach to your garage door’s health is the best way to prevent sudden breakdowns. By spending just 15 minutes twice a year on basic upkeep, you can significantly extend the lifespan of your springs, rollers, and opener. For a comprehensive checklist, take a look at How to Prevent Garage Door Breakdowns in 5 Simple Steps.
How Seasonal Weather Triggers Garage Door Repair — Most Common Problems and Causes
Weather plays a massive role in how your garage door behaves. In our service areas across Middle and East Tennessee, we experience distinct seasonal shifts—from hot, humid summers to freezing winter temperatures.
Cold weather causes metal components to contract slightly, which can put extra friction on your tracks and rollers. Furthermore, cold temperatures cause standard lubricants to thicken and become gummy, increasing the resistance of the door and forcing your opener to work harder.
Winter is also when older weatherstripping becomes brittle and cracks. If your bottom rubber seal is damaged, freezing rain can seep under the door and freeze it directly to your garage floor. If you try to open a frozen door, the opener can tear the bottom seal off or burn out its motor trying to break the icy bond.
In the humid summer months, metal parts are more prone to rust, and wood doors can swell, causing them to bind in the tracks. Keeping your door clean and properly lubricated throughout the year is key to resisting these weather-induced issues.
Semi-Annual Lubrication and Hardware Tightening
To keep your door running quietly and smoothly through every season, follow this quick semi-annual maintenance routine:
- Clean the Tracks: Wipe down the inside of your metal tracks with a damp rag and mild dish soap to remove built-up grease, dirt, and debris. Never apply lubricant directly to the tracks, as this will actually attract dust and grime, creating a sticky paste that clogs your rollers.
- Tighten the Hardware: Use a socket wrench to check and tighten all the hinge bolts, track bracket nuts, and opener mounting hardware. Be careful not to touch any red-painted bolts, as these indicate high-tension components.
- Lubricate the Moving Parts: Use a high-quality silicone spray or white lithium grease. Avoid WD-40, as it is a solvent and degreaser, not a true lubricant; it will quickly evaporate and strip away any existing grease. Apply lubricant to:
- Roller Bearings: Spray directly into the center ball bearings of each roller (avoiding the plastic or nylon wheel itself).
- Hinges: Apply a small amount to each pivot point.
- Torsion Springs: Spray the entire length of the spring coils to reduce friction between the coils as they wind and unwind.
- Opener Rail: If you have a chain or screw-drive opener, apply a thin layer of white lithium grease along the rail. Do not lubricate belt-drive openers.
Frequently Asked Questions About Garage Door Troubleshooting
Why does my garage door start to close and then immediately reverse?
This is almost always caused by a safety sensor issue. If the photo-eye sensors near the floor are dirty, misaligned, or blocked by an object (even a stray leaf or a spiderweb), the opener will assume something is in the door’s path and reverse for safety.
If the sensors look clean and aligned, the issue could be your close-limit settings. The close-limit switch tells the opener how far the door needs to travel to reach the floor. If this setting is off, the door may hit the ground, assume it has run into an obstacle, and reverse to avoid crushing it. You can adjust this setting in small increments using the adjustment screws on the side of your opener motor unit.
How long do garage door springs, rollers, and openers typically last?
- Springs: Standard springs are rated for 10,000 cycles (one cycle is opening and closing the door once). For most households, this translates to 7 to 10 years of use.
- Rollers: Standard steel rollers last about 5 to 7 years, while high-quality nylon rollers with sealed ball bearings can easily last 10 to 15 years with proper lubrication.
- Openers: Most modern garage door openers last between 10 and 15 years. Belt-drive and direct-drive units often outlast chain-drive models.
Can I use WD-40 to lubricate my garage door tracks and rollers?
No. WD-40 is a water displacer and solvent, not a long-lasting lubricant. While it might temporarily quiet a squeak, it will quickly dry out, leaving behind a sticky residue that attracts dust, dirt, and hair. This buildup will eventually clog your rollers and make the problem worse. Always use a dedicated silicone-based spray or white lithium grease designed for garage door hardware.
Conclusion
At Dad & Daughter Garage Door Repair, we know how stressful a broken garage door can be. Since 1996, our family-owned and locally operated business has been keeping homes secure and convenient across the Nashville area, Chattanooga, and Knoxville. Unlike many companies today, we have no private equity backing—meaning our focus is entirely on providing honest, high-quality customer care to our local Tennessee neighbors.
Whether you need a quick spring replacement, a new opener, or a complete door upgrade, our experienced technicians are ready to help. If you are experiencing any of these common garage door issues, don’t wait for them to turn into an emergency. Head over to our Garage Door Repair Nashville Area page to schedule your service or request a friendly, hassle-free consultation today!
Need Help?
Contact us today to discuss your needs. Our team is ready to help.
About the Author
Dad And Daughter Garage Door Service
More Articles
View All PostsRelated Articles

Why Nashville Building Codes Dictate Specific Wind Load Ratings
An unbraced garage door is the largest structural vulnerability during severe weather. See exactly what local inspectors look for to ensure your new build meets current wind load requirements.
Read Article
The Cost Difference Between Stamped Steel and Custom Wood Doors
Choosing between custom wood and steel means looking past the initial estimate. Understand the lifetime maintenance realities of each material before your next exterior upgrade.
Read Article
Preparing Your Commercial Warehouse Doors for Winter Deliveries
September is the critical window to secure your loading docks before freezing temperatures cause mechanical failures. Learn how to address degraded hardware and protect your Q4 shipping schedule.
Read ArticleReady to Get Started?
Whether you need a repair, maintenance, or a new installation, our expert team is here to help.